안녕하세요 Acorn입니다.
오늘은 WIZnet의 제품인 W5500-EVB-Pico를 사용해서 OpenAI API를 호출하여 사용해보려고 합니다.
W5500이 저렴한 가격에 S2E를 지원하는 제품인만큼, PC나 클라우드를 연동하여 사용하여 서비스를 구현하면 가격대비 굉장히 매력있는 컨텐츠가 나올 수 있다 생각합니다. 이미 STM32나 SparkFun Edge같은 제품의 경우 AIoT를 많은 부분에서 적용하였고, 실제로 많은 AIoT 컨텐츠들이 시중에 나와있으나, 아직 LLM과 보드를 융합시키는 움직임은 보이지 않는 것 같습니다. 그래서 저희 제품인 W5500-EVB-Pico를 사용해 정말 저렴하게 언어모델을 사용할 수 있는 방법에 대해 소개해보고자 합니다.
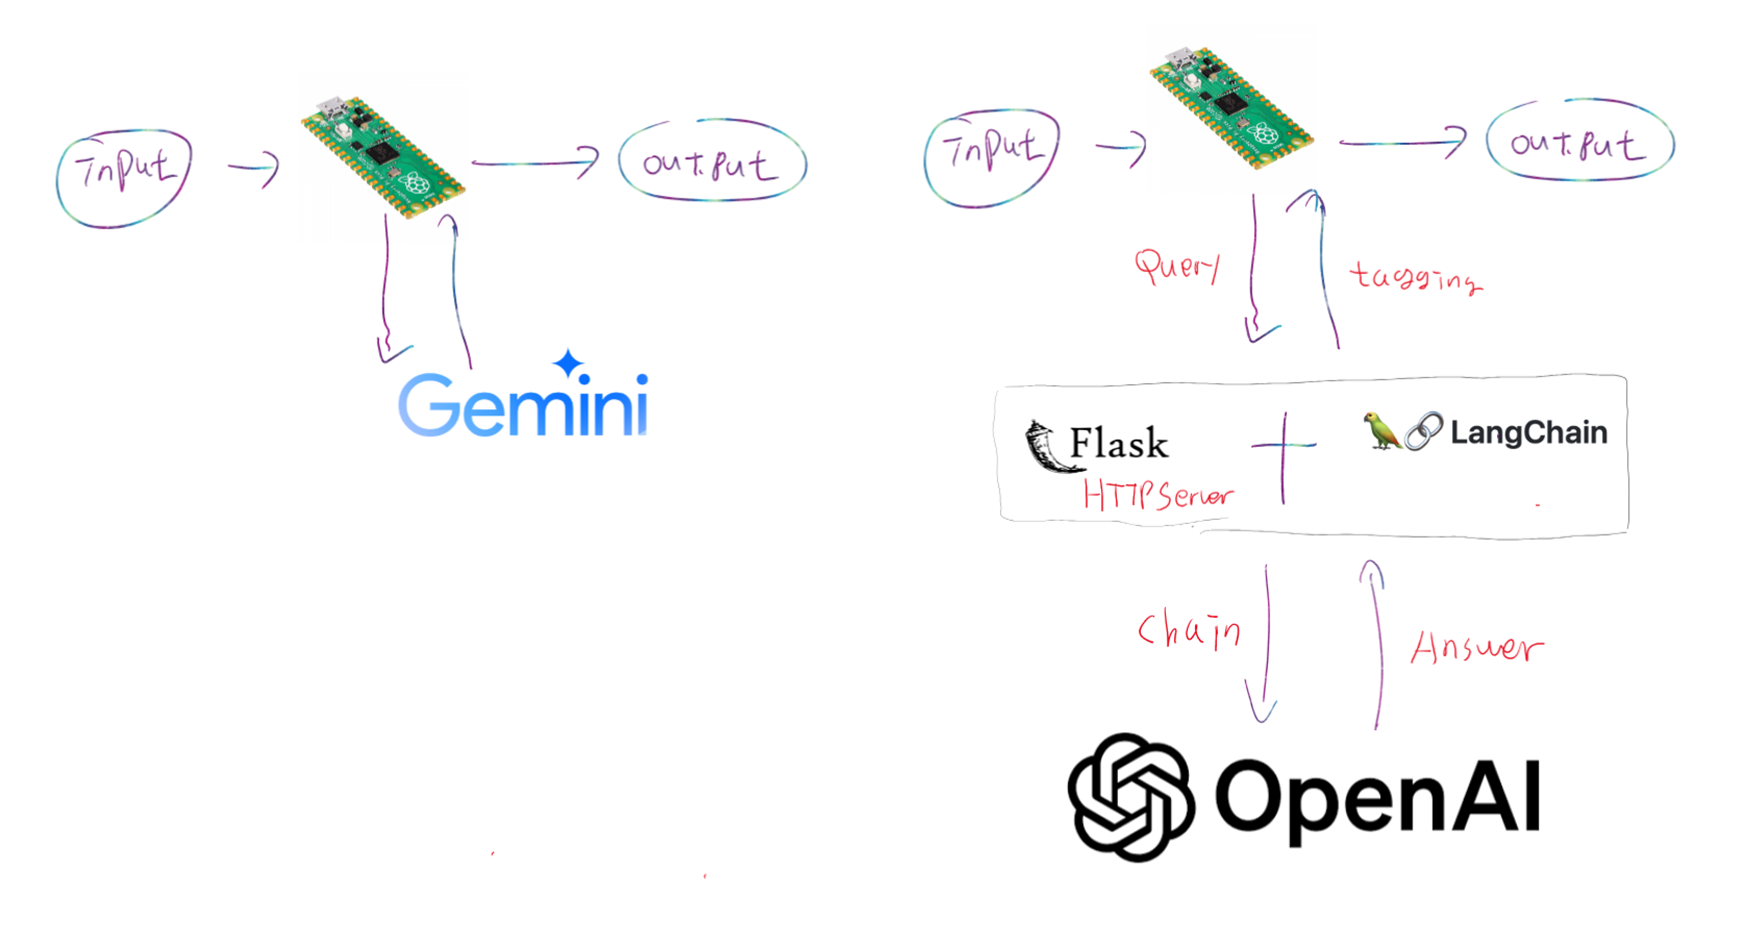
https://maker.wiznet.io/simons/projects/using%2Dgoogle%2Dgemini%2Dpro%2Dwith%2Dpico/ Simon 엔지니어가 개발했던 Pico - Gemini 연결 프로젝트입니다. micropython환경에서 urequest통신을 통해 gemini api를 호출하여 내 Thonny 인터프리터 화면에서 출력 결과를 확인할 수 있습니다. urequest을 사용했기에 Https통신이 가능하고, gemini api호출이 가능합니다.

하지만 request를 사용하기 위해 micropython을 사용하는만큼, 다른 C++기반 외부 모듈과의 호환이 되지 않는 어쩔 수 없는 단점이 있습니다.
앞서 말했듯, W5500은 Serial to Ethernet통신만을 지원합니다. 즉 https통신은 지원하지 않아 Pico와 직접 통신하려면 별도의 SSL-TLS 보안 규약을 추가해줘야 합니다.
그렇기에 저는 중간에 Flask로 http서버를 두어 중간 통신 연결다리를 두고, Flask에서 LangChain결합하여 Pico에서 문자열 파싱 정도의 처리만 하면 센서,디바이스를 제어할 수 있게끔 프로젝트를 설게하였습니다.

Arduino IDE에서 Serial Moniter를통해 openai에게 질문을 하면, Flask에서 랭체인을 연결하고, Tagging을 사용하여 응답내용을 정합니다. Schema에 minimun값과 maximum값을 명시하여 Pico에 값을 전달할 때 다른 값이 전달되지 않도록 방어벽을 설정해둡니다. 이후 파싱하기 쉽게 문자열과 쉼표(,)로만 데이터를 보내줍니다.
led_Control_Schema = {
    "properties": {
        "brightness of lights": {
            "type": "integer",
            "minimum": 0,  # 최소값을 0으로 설정
            "maximum": 255,  # 최대값을 255로 설정
            "description": "This field specifies the brightness of lights, from 0 (completely off) to 255 (full brightness). Be sure to use only multiples of 7 to give users a variety of values. Consider the user's situation and emotions to come up with an appropriate brightness. Let's Think about step by step",
        },
    },
    "required": ["brightness of lights"]
}
값을 Pico에 받아왔으면, 데이터를 파싱하여 각 센서 혹은 디바이스별 장치를 파악하고, 그에 맞게 장치를 제어해주면 완성입니다. 여기서는 led와 온.습도센서만 제어하게끔 해보았습니다.(다른 센서들은 계속해서 추가할 예정입니다.)
void post_to_APIServer(String device, String myQuery, Container &container) {
  String deviceData = "POST /" + device + " HTTP/1.1";
  String postData = "{\"query\": \"" + myQuery + "\"}";
  String myResponse = ""; // 서버로부터의 응답을 저장할 변수

  if (client.connect(server, 8080)) {
    Serial.println("Connected to server");
    // HTTP 요청 전송
    client.println(deviceData);
    client.println("Host: 192.168.0.5:8080");
    client.println("Content-Type: application/json");
    client.println("Connection: close");
    client.print("Content-Length: ");
    client.println(postData.length());
    client.println();
    client.println(postData);

    // 서버로부터의 응답 읽기
    while (client.connected() || client.available()) {
      while (client.available()) {
        char c = client.read();
        myResponse += c; // 서버로부터 읽은 문자를 응답 문자열에 추가
      }
    }
    client.stop();

    // HTTP 응답에서 본문만 추출
    int headerEndIndex = myResponse.indexOf("\r\n\r\n") + 4;
    String responseBody = myResponse.substring(headerEndIndex);
    responseBody.trim(); // 본문의 시작과 끝의 공백 제거
    responseBody.replace("\"", "");

    // 본문 분석 및 구조체에 값 할당
    if (responseBody.startsWith("led,")) {
      int index = responseBody.indexOf(',');
      int bright = responseBody.substring(index + 1).toInt();
      container.ledStruct.bright = bright;
    } else if (responseBody.startsWith("dht,")) {
      int firstIndex = responseBody.indexOf(',');
      int secondIndex = responseBody.indexOf(',', firstIndex + 1);
      float latitude = responseBody.substring(firstIndex + 1, secondIndex).toFloat();
      float longitude = responseBody.substring(secondIndex + 1).toFloat();
      container.dhtStruct.latitude = latitude;
      container.dhtStruct.longitude = longitude;
    } else {
      Serial.println("Unknown sensor type in response.");
    }
  } else {
    Serial.println("Connection failed");
  }
}

"불좀 꺼줄래?" 라고 입력하면 pico내장 led의 불빛이 꺼지고, "조명을 은은하게 켜줘" , "무드있는 분위기로 불을 켜줘" 등을 입력하면 중간값의 불빛이, "환하게 켜줘"와 같은 발화는 최대불빛을 켜주게 됩니다.
현재까지 진행된 상황은 토이프로젝트 수준으로 데이터스트럭쳐 관점, 프로젝트의 시스템플로우 관점에서도 다소 아쉬울 수 있으나 계속해서 개선해가고, 내용을 추가해가서 WIZnet제품으로 챗봇을 응용할 수 있는 시스템을 구현하는 것을 목표로 계속해서 달려나갈 예정입니다.