안녕하세요 Simon 입니다.
오늘은 조금 색다르게 코드 리뷰를 해볼 생각입니다. 작년 말 MoE 전문가 네트워킹 라우팅 방식의 트랜스포머 기반의 MoE 를 리뷰해드린적 있는데 이게 성능도 좋고 실제로, 많이 보이고 있습니다. 우연히 유투브를 보다가 가볍게 커스텀데이터를 파인튜닝 할 수 있는 코드를 찾았고 이에 관련하여 리뷰를 해보겠습니다.
Fine-tune Mixtral 8x7B (MoE) on Custom Data - Step by Step Guide
!pip install transformers trl accelerate torch bitsandbytes peft datasets -qU
!pip install flash-attn --no-build-isolation

from datasets import load_dataset
instruct_tune_dataset = load_dataset("mosaicml/instruct-v3")
우선 라이브러리를 설치 해주는데요. 여기서 생소할 수 있는 라이브러리는 bitsandbytes 로 모델을 양자화할때 쓰는 라이브러리입니다. 이 코드에서는 4bit 로 양자화를 해서 진행을 하네요.
그리고 flash-attn 모델 아키텍처가 플래쉬 어텐션 구조 이기 때문에 설치를 해주어야하는데 윈도우에서 error 가 종종 납니다. C++ 관련 microsoft 빌더를 설치해야하는데 그래도 계속 나서 저는 Colab / Mac 에서 진행했습니다.
Data Set
mosaicml/instruct-v3 · Datasets at Hugging Face
Below is an instruction that describes a task. Write a response that appropriately completes the request. ### Instruction In your own words, condense the following text: Piper: We're gonna beat this, Leo, just like we always do. Leo: You've always been a b
huggingface.co
이 데이터셋은 Dolly-15k 및 Anthropic Helpful and Harmless (HH-RLHF) 데이터셋으로부터 파생된 Dolly HHRLHF, Competition Math, Duorc, CoT GSM8k, Qasper, Quality, Summ Screen FD, 그리고 Spider 데이터셋을 포함합니다

- Prompt(사용자의 쿼리 일 것이고, Response 모델로부터 받은 답변 , Source 출처 일 것입니다

{'prompt': 'Below is an instruction that describes a task. Write a response that appropriately completes the request.\n\n### Instruction\nWhat are different types of grass?\n\n### Response\n',
 'response': 'There are more than 12,000 species of grass. The most common is Kentucky Bluegrass, because it grows quickly, easily, and is soft to the touch. Rygrass is shiny and bright green colored. Fescues are dark green and shiny. Bermuda grass is harder but can grow in drier soil.',
 'source': 'dolly_hhrlhf'}
보다시피 Prompt 와 response 의 형태로 되어있다.

Mixtral 을 훈련하기 위한 데이터셋 입니다.
Create Formatted Prompt
def create_prompt(sample):
  bos_token = "<s>"
  original_system_message = "Below is an instruction that describes a task. Write a response that appropriately completes the request."
  system_message = "[INST]Use the provided input to create an instruction that could have been used to generate the response with an LLM."
  response = sample["prompt"].replace(original_system_message, "").replace("\n\n### Instruction\n", "").replace("\n### Response\n", "").strip()
  input = sample["response"]
  eos_token = "</s>"

  full_prompt = ""
  full_prompt += bos_token
  full_prompt += system_message
  full_prompt += "\n" + input
  full_prompt += "[/INST]"
  full_prompt += response
  full_prompt += eos_token

  return full_prompt
함수들은 다음과 같은 단계를 거칩니다.
- 시작 토큰(<s>)을 정의합니다. 이는 입력의 시작을 표시하는 데 사용됩니다.
- 원래 시스템 메시지를 정의합니다. 이 메시지는 입력 데이터에 포함되어 있지 않아야 할 설명적인 텍스트입니다.(아래는 작업을 설명하는 지침입니다. 요청을 적절히 완료하는 응답을 작성하세요.)
- 시스템 메시지를 새로운 지시사항 형태로 변경합니다. 이 새로운 메시지는 언어 모델이 어떻게 지시사항을 이해하고 실행해야 하는지를 설명합니다.
- 제공된 샘플에서 prompt 부분을 추출하여, 원래 시스템 메시지와 지시사항 부분을 제거합니다. 이렇게 하여 실제로 모델이 생성해야 할 응답(response)만을 남깁니다.
- 샘플의 response 부분을 입력으로 사용합니다.
- 종료 토큰(</s>)을 정의합니다. 이는 입력의 끝을 표시하는 데 사용됩니다.
- 전체 프롬프트를 구성합니다. 이 프롬프트는 시작 토큰, 새로운 시스템 메시지, 사용자 입력, 지시사항을 종료하는 특수 토큰, 실제 모델이 생성해야 할 응답, 그리고 종료 토큰을 차례로 포함합니다.
'<s>[INST]Use the provided input to create an instruction that could have been used to generate the response with an LLM.\nThere are more than 12,000 species of grass. The most common is Kentucky Bluegrass, because it grows quickly, easily, and is soft to the touch. Rygrass is shiny and bright green colored. Fescues are dark green and shiny. Bermuda grass is harder but can grow in drier soil.[/INST]What are different types of grass?</s>'
---
'<s>[INST]제공된 입력을 사용하여 LLM으로 응답을 생성하는 데 사용할 수 있는 명령을 만듭니다.\n잔디의 종류는 12,000종이 넘습니다. 가장 흔한 것은 켄터키 블루그래스인데, 빠르고 쉽게 자라며 촉감이 부드럽기 때문입니다. 라이그래스는 광택이 있고 밝은 녹색입니다. 페스큐는 짙은 녹색에 광택이 있습니다. 버뮤다그래스는 더 단단하지만 건조한 토양에서 자랄 수 있습니다. [/INST]잔디에는 어떤 종류가 있나요?</s>'
<s> 로 시작과 끝을 구분해주고 , 먼저 기본공통 지시사항이 들어가고 , 내용을 알려주고, 인스트럭션이 끝나면, 질문이 나오는 방식의 형태의 프롬프트 입니다. 끝으로 </s> 를 사용해서 데이터셋의 형태를 갖추어 줍니다.
Loading the base Model
from transformers import AutoModelForCausalLM, AutoTokenizer, BitsAndBytesConfig
import torch

model_id = "mistralai/Mixtral-8x7B-v0.1"

# 양자화를 위한 Config 설정 BitsAndBytesConfig

nf4_config = BitsAndBytesConfig(
   load_in_4bit=True,
   bnb_4bit_quant_type="nf4",
   bnb_4bit_use_double_quant=True,
   bnb_4bit_compute_dtype=torch.bfloat16
)

# 모델 정의

model = AutoModelForCausalLM.from_pretrained(
    model_id,
    device_map='auto',
    quantization_config=nf4_config,
    use_cache=False,
    attn_implementation="flash_attention_2"

)

# 토크나이저 정의
tokenizer = AutoTokenizer.from_pretrained(model_id)

tokenizer.pad_token = tokenizer.eos_token
tokenizer.padding_side = "right"
위 코드에서는 4bit 의 형태로 Quantization 을 하기 위해서 bnb 라이브러리 방식의 config 를 활용합니다. 양자화가 모델의 크기는 줄일 수 있지만. 정밀도의 손실이 항상 올 수 있다는 점은 유의 하셔야 합니다. 그러나?! 파인튜닝, PLM 써보지도 못하는것보다는 양자화해서 맛이라도 보는게 낫다고 생각합니다.
nf4는 특정 가중치를 로드 하기 위한 양자화 방식입니다. 자세한건 bnb 허깅페이스나 깃허브를 참조 바랍니다.
Use_double_quant 는 더블 이중 양자화로 정보손실을 최소화 하기 위해 설계 된 것으로 True 로 설정이 되어있습니다. 사실 많이 건드려본 파라미터는 아니라서, 당연히 이중으로 하는만큼 시간이 더 걸릴 것이라고 생각이 드네요
익숙한 16비트의 부동 소수점 데이터 타입으로 GPU 계산의 형태지정입니다.
모델에서 특이한 점은 아무래도 Flash_attention 입니다. 플래쉬 어텐션자체는 기존 어텐션 메커니즘이 가진 디멘젼의 제곱의 비례해서 코스트가 들어가서 병목현상이 발생해서 그에 따른 속도를 개선해서 나온 방법이다. 메모리 사용을 최적화하는 방법인데 2가 나왔기도 하다. 이 부분에 대해서는 나중에 논문리뷰를 하던지 해보겠습니다.
토크나이저에서는 기존 트랜스포머와 비슷합니다. 이름을 통해 토크나이저를 지정하고 토크나이저의 패딩토큰은 eos 로 대체하겠다는 설정이고 패딩방향은 우측 시퀀스에 지정함으로 써 나중에 맥스렝스에 따른 생성된 결과값을 패딩토큰으로 대체하기 위함입니다.
def generate_response(prompt, model):
  encoded_input = tokenizer(prompt,  return_tensors="pt", add_special_tokens=True)
  model_inputs = encoded_input.to('cuda')

  generated_ids = model.generate(**model_inputs,
                                 max_new_tokens=512,
                                 do_sample=True,
                                 pad_token_id=tokenizer.eos_token_id)

  decoded_output = tokenizer.batch_decode(generated_ids)

  return decoded_output[0].replace(prompt, "")
Prompt 와 model 이 들어가고, 다른 트랜스포머의 정의와 비슷 합니다.
def tokenize_prompts(prompt):
    return tokenizer(create_prompt(prompt))

tokenized_train_dataset = instruct_tune_dataset["train"].map(tokenize_prompts)
tokenized_val_dataset = instruct_tune_dataset["test"].map(tokenize_prompts)
데이터셋에 토크나이저를 적용하고 , 모델이 이해할 수 있는 형태로 전처리한다.
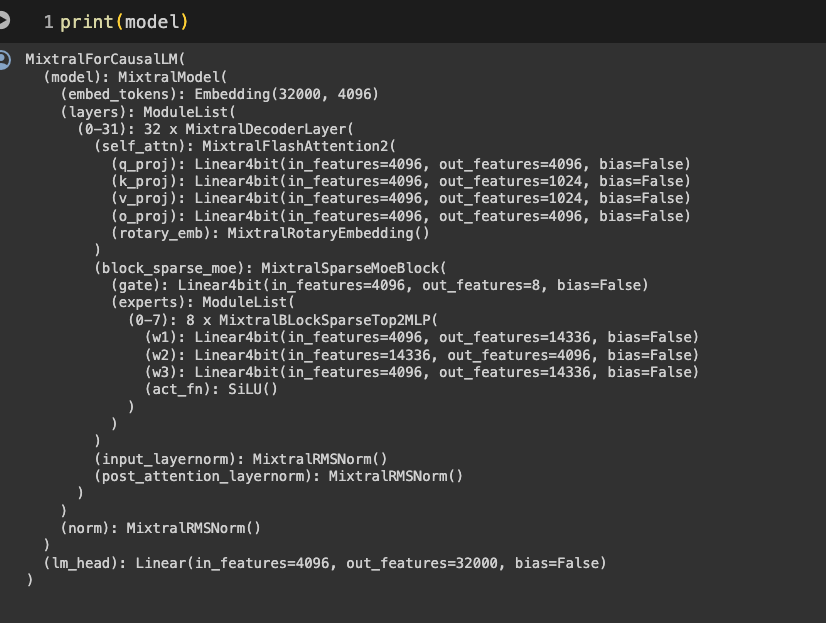
여기서 모델의 구조를 보고 생각해볼 점은 디코더 구조의 차이이다. 우선 Mixtral 의 모델은 gate 이후 w1,w2,와 같은 expert 즉 전문가들 구조를 통해구조가 이루어졌다는 점이다.

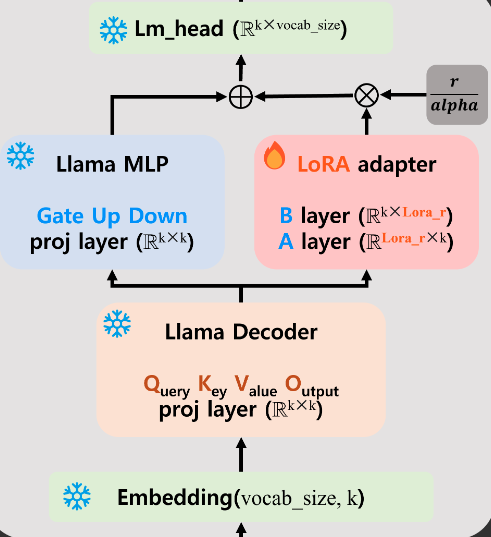
기존의 로라 튜닝의 형태이다.
재미있는 건 다음코드를 보면 알 수 있다.
from peft import LoraConfig, get_peft_model, prepare_model_for_kbit_training

peft_config = LoraConfig(
    lora_alpha=16,
    lora_dropout=0.1,
    r=64,
    bias="none",
        target_modules=[
        "q_proj",
        "k_proj",
        "v_proj",
        "o_proj",
        "gate_proj",
        "up_proj",
        "down_proj",
        "lm_head",
    ],
    task_type="CAUSAL_LM"
)

model = prepare_model_for_kbit_training(model)
model = get_peft_model(model, peft_config)
PERT LoRA 튜닝을 위해서 설정을 해주는데 기존의 라마형태는 gate_proj, down_proj,uip_proj 였다면, 모든게 타겟이 되는게 특이했다.

다시 모델을 prin 해보면 4비트의 양자화가 적용되어 하이퍼파라미터들이 적용된 구조이다. 말 그대로 로라자체는 기존의 레이어는 얼려두고 A,B 레이어를 학습시켜서 머지하는 형태의 학습 방법론이기 떄문에 볼 수 있는 구조이다.
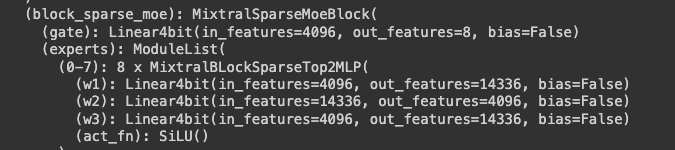
코드를 보면서 0-7까지의 구조가 나오지 않은점이 궁금하긴 했다 혹시 위 코드를 보고 있는 분이 아신다면 얘기를 해주시면 감사하겠습니다.
-> 문득 코드를 보다가 혼자 꺠달았습니다. 말그대로 x8개의 구조로 있고 기존의 gate , up , down 의 구조를 w1,w2,w3 이 해주는 것이고

기존의 구조에서 같이 MLP 와 Lm_head 또한 학습이 같이 진행되는 형태 였습니다. 그만큼 그대신 GPU 리소스는 필요할 것으로 예상이 되는데 그래서 4bit 를 착안했구나 생각이 들었습니다. 기존 라마 파인튜닝 코드와 같이 리딩하면 더 도움이 됩니다.
- Lora_r: LoRA adapter의 차원을 결정하는 파라미터
- Lora_alpha: LoRA adapter의 scaling 값을 결정하는 파라미터
- Lora_dropout: LoRA adapter의 dropout 파라미터
- Lora_target_modules: LoRA adapter를 적용할 layers
Hyper-paramters for Training
from transformers import TrainingArguments

args = TrainingArguments(
  output_dir = "Mixtral_Alpace_v2",
  #num_train_epochs=5,
  max_steps = 1000, # comment out this line if you want to train in epochs
  per_device_train_batch_size = 32,
  warmup_steps = 0.03,
  logging_steps=10,
  save_strategy="epoch",
  #evaluation_strategy="epoch",
  evaluation_strategy="steps",
  eval_steps=10, # comment out this line if you want to evaluate at the end of each epoch
  learning_rate=2.5e-5,
  bf16=True,
  # lr_scheduler_type='constant',
)

from trl import SFTTrainer

max_seq_length = 1024

trainer = SFTTrainer(
  model=model,
  peft_config=peft_config,
  max_seq_length=max_seq_length,
  tokenizer=tokenizer,
  packing=True,
  formatting_func=create_prompt, # this will aplly the create_prompt mapping to all training and test dataset
  args=args,
  train_dataset=instruct_tune_dataset["train"],
  eval_dataset=instruct_tune_dataset["test"]
)

trainer.save_model("Mixtral_Alpace_v2")
#모델 머지
merged_model = model.merge_and_unload()
하이퍼 파라미터 셋팅은 10스탭 단위로 eval을 하고, 에폭당 저장을 하는 것 이 었는데, 라마는 스탭단위로 저장을 하는거에 비해 조금 달랐습니다.
옵티마이저가 따로 설정은 안되어있었으나 AdamW 로 설정해주면 좋을 거 같습니다.
모델 머지 부분에서는 그냥 머지코드만 있었는데 기존의 모델과 붙히는 코드가 없긴했습니다. 되는건지는 코드를 한번 실행을 해봐야 알 것 같습니다. 이부분은 따로 수정해 놓겠습니다.
이렇게 기존의 모델을 업로드하고, 허깅페이스에 API Key 를 Write 로 발급받아서 올려주면 됩니다. 막상 코드가 라마때보다 간결해서 좋았습니다. 이것으로 간략한 Mixtral 모델로 Custom dataset 튜닝하는 방식에 대해 설명하였습니다.
'AI > Contents' 카테고리의 다른 글
| Ollama를 활용한 맥북 Github Copilot 구축하기 - (2) (2) | 2024.02.15 |
|---|---|
| Ollama를 활용한 아이폰으로 Ondevice AI 같은 서비스 구축하기 (3) | 2024.02.15 |
| [Langchain] 처음시작하는 랭체인 - (1) (3) | 2024.01.24 |
| 라즈베리파이와 GPT-4-VISION Few-shot을 통한 예제 메인페이지 게재 (3) | 2024.01.18 |
| LLM 데이터셋 관련 정리 - 대규모 원시 말뭉치 (4) | 2024.01.17 |


